
Video
These assets are available to staff and faculty for creating UCalgary-branded videos. If you need support with filming and editing, please contact a video production vendor from the UCalgary preferred suppliers list.
Video production guide
The purpose of this guide is to standardize the way in which we package marketing and communications storytelling video at UCalgary so it accurately and consistently reflects the institution’s style and brand position.
This information may be useful for video-production units contracted to help with university projects as well as for staff across the university who are producing their own footage. These standards are not intended to influence video-production related to the delivery or capture of academic course content, though faculty and support staff may find them a useful reference.
To develop a quality video, begin by answering these questions:
- Why do you want to make a video? Is video the best medium for the message?
- Perhaps you want to communicate an important message or tell a story? Maybe you want to sell something or inspire a call to action?
- What are you trying to say?
- Figure out your message(s) and decide what do you want your audience to think, feel, and do with that message.
- To whom are you speaking?
- What is your audience like and why will/should they care about your video message or act on it? How old are they? What gender are they? Where do they live? What are their ‘hot buttons’?
- How will the video be shared?
- Will you be airing it on broadcast, cable or satellite television? Distributing a DVD? Posting to the web? Screening it at an event?
All of these affect creative recommendations, the schedule and the cost.
The ‘pre-production’ phase is when you create a plan for your video project.
Your production could be simple (a series of ‘man-on-the-street’ interview clips, static shots of a “talking head” in a single location, little or no camera movement, no extraneous lighting or special effects) or complex (on-location filming, actors, action shots with multiple angles and cameras, multiple lighting effects, supplementary audio and voiceover tracks, special effects, etc.)
Regardless, you need to make some decisions:
- Can you produce this video on your own or will you engage a video production service provider? If the latter, do you have a defined budget?
- Who needs to be involved in the project? Is there a team of people? If yes, how many production meetings will you need (if any) and when?
- Who has to approve your work before it is finalized? When will you engage them in the process?
-
Working with a video-production company
If you work with a video-production service provider, they will help plan the project and the shoot schedule using tools such as work-back schedules, storyboards, sketches of visual treatments, outline/script, location and talent scouting plans (visual, voiceover etc.), and a budget.
The following steps will help you to commission work with a video-production service provider:
- Develop your idea
- If you are based in a faculty or unit, contact your faculty/unit marketing communications staff. They can offer guidance on process, connect you to existing materials that may be of use, and provide advice on how to find and qualify a suitable supplier. They can also help you think through the four initial questions noted above.
- Write a project brief
- Include as much detail as possible — when suppliers are working with unknowns or having to make assumptions, the costs to you are likely to increase.
- Clearly state your expectations in terms of their response (e.g., a basic quote or outline approach [for smaller, lower budget work], or a more detailed proposal [for larger, higher budget work]).
- Consider any other related work that you may need in the near future — this can be included in the brief to help the suppliers understand the full scope of your needs.
- Find a production house
- Start by assessing the resources available to you on campus. Reference the Preferred Suppliers List (Video, Production and Motion Graphics) for vetted UCalgary suppliers.
- If these suppliers do not meet your requirements you are welcome to contract any other production house but may need to offer sole-source justification to Supply Chain Management for suppliers used outside of the preferred list.
- Select and orient a supplier
- Once you have selected a supplier, be sure to direct them to the UCalgary Brand site to reference our standards and guidelines and contact the Brand team if necessary.
- Develop your idea
-
Producing a video on your own
You may have access to cameras and editing equipment, and wish to produce your own video. The following steps will help you to organize and complete your work:
- Develop your idea
- If you are based in a faculty or unit, contact your faculty/unit marketing communications staff. They can offer guidance on process, connect you to existing materials that may be of use, and help work through your idea and consider the needs of your audience(s).
- Write a project brief
- Include as much detail as possible so that you can organize all of your thoughts and requirements before you begin.
- Produce a storyboard and/or a script
- A storyboard is a sequence of drawings, typically with some directions and dialogue, representing the shots planned for a movie or television production. This can be done on paper or use a storyboard app (i.e. Studio Binder)
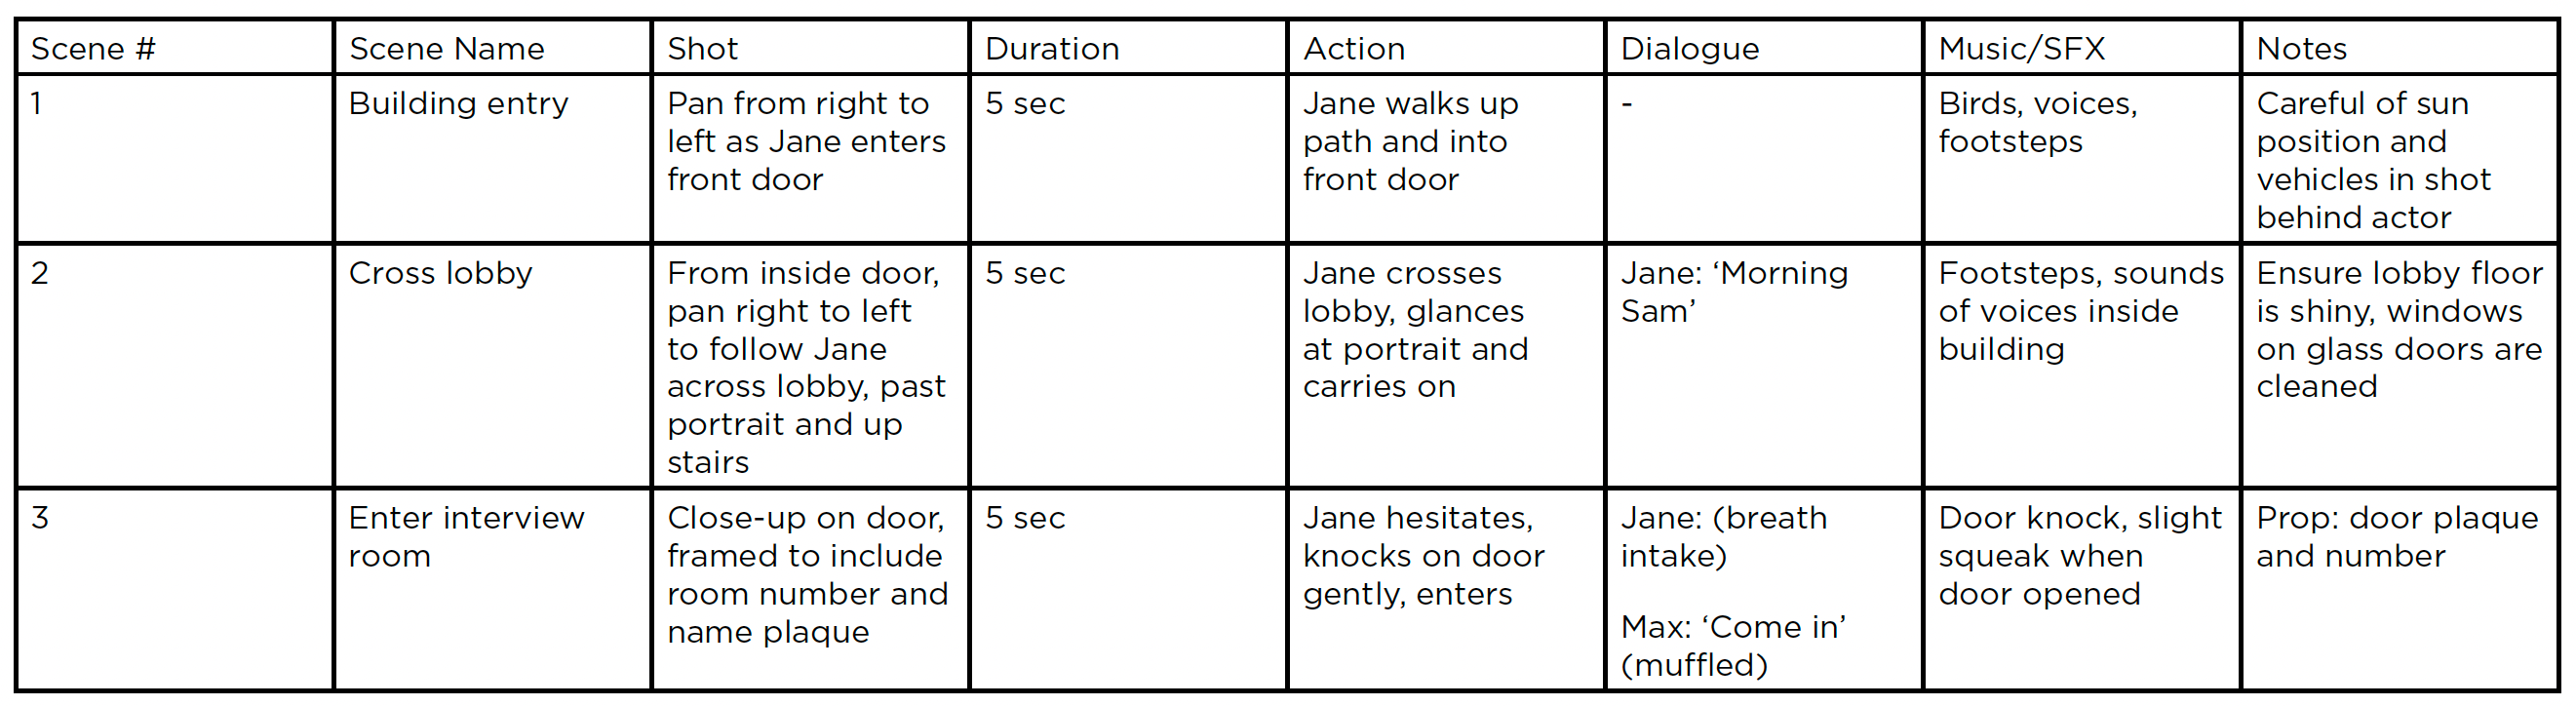
- A script is a document that outlines every aural, visual, behavioral, and lingual element required to tell a story. Click here for an example.
If you are working with a video-production service provider, they will organize the shoot and advise you of your roles and responsibilities.
- Develop your idea
If you are producing a video on your own, you may need some or all of the following resources for a single-camera shoot:
People
- Producer: oversees the whole process of making the video, including financial, staffing and administrative matters
- Director: responsible for the look of the video, making decisions about such things as cameras, lenses, lighting, color scheme, and shot composition
- Videographer: operates the camera, capturing the desired content
- Video editor: selects clips, edits and manipulates footage and supporting text/graphics to create the complete video
- Audio engineer: records, edits, manipulates, mixes, and masters sound to create the video’s audio track
- Interview subjects
- Actors (live and/or voice)
- Makeup person
Equipment
- Video camera (+ extra battery packs, memory cards): High or standard definition will depend on desired distribution.
- Tripod
- Lighting, tape for cables
- Microphones: a boom mic, lavaliere (lapel) mic, wind sock (if filming outside)
- Stage/platform, seating
- Props
Note: A wind sock is a windshield for a microphone; it is made of artificial fur or foam and is designed to minimize wind noise while remaining acoustically transparent.
You may choose to produce your video solo and completely unscripted, for example, by simply preparing a list of questions and selecting random passersby who are willing to provide you with a response on camera.
In this case, you will still need to consider the setting, camera angles, audio capture (a good mic is critical, used in close proximity to the voice or mouth, especially in busy public spaces), and how you will identify your subjects on screen. It is best to be prepared before capturing footage you may not be able to use.
Format and aspect ratio
It is important when shooting to consider the multiple different ways the video might be watched (television, web browser, plasma screen, iPad, smart phone, etc).
For quality and flexibility of the final video product, the default aspect ratio for footage should be 16:9 widescreen. If possible, shoot video in full high-definition (HD) at 1920 x 1080 (1080p) pixels. This is high-enough resolution for plasma screens and quality streaming, but can easily be compressed for lower bandwidth.
For online video, a typical dimension would be 1280 x 720 (720p) pixels, however if the video is shot in HD, the encoder should scale accordingly, meaning it should work for YouTube, Vimeo, etc.
Sound
Consider capturing audio separately to ensure the highest quality and fewest ambient distractions. Consider the nature of audio needed (stereo, surround) and use capture devices or high-quality mics as appropriate.
Shooting style
- Simple shots cut together in a way that best illustrates the narrative works best.
- Avoid extreme angles.
- Avoid shooting that will produce frequent cuts in the final video: this can trigger photosensitive epilepsy in some individuals.
- Do not zoom in and out — it is not a natural eye movement.
- Frame the subject using the ‘rule of thirds’. Imagine a tic-tac-toe board where the lines intersect in four spots and frame the action using one or more of those spots, keeping the subject out of the centre square.
Interviews
- Make the background look interesting but keep it simple and clutter-free.
- Try to use natural light so that it falls on your subject — not behind them (i.e. do not position them in front of a window as they will appear in silhouette. Consider adding or reflecting light to enhance your subject.
- Watch for background objects that may interact negatively with your subject on screen. (e.g. plants, poles and structural features that may appear to be growing out of your subject’s head)
- Ensure that the seating (if applicable) is level and does not squeak or scrape. Avoid chairs that swivel or roll.
- Position and sound-check lav mics to ensure good audio capture and tidy wiring. Ask your subject to remove excessive ‘clunky’ jewelry that may cause unwanted noise in a lav mic. Avoid filming in loud or windy areas.
- Check shirt buttons (not gaping, use tape if necessary), collars (not flipped up), necklaces (clasp not showing), ties (not askew), hair (no distracting flyaways), face (not shining, powder is a useful tool to have handy). If you have the option of requesting wardrobe choices before the interview, request that the subject not wear all-white, herringbone, fine or checkered patterns.
- Chat with your subject a bit before you get to your questions; it establishes a human connection and allows the sound technician to check the microphone levels.
- Off-camera interviews work well. Remember to ask open questions (“What appealed to you about this?” not “Did it appeal to you?” which will get a “yes” or “no” answer). This is so the replies can be used as stand-alone sound-bites without the questions.
- Remember to ask your interviewees to start their answer within the context of the question. (“The program appealed to me because…”)
- Think about and capture cutaway shots or B-roll (supplementary footage that illustrate the narrative) that are relevant and copyright-free (see below). They should add to the story-telling, not just cover up an edit. It is best to discuss these with the interviewer as they will be a good source, either as something you can film at the time of the interview (e.g. them walking away or engaging with other subjects) or they may have access to relevant stills or footage (ensure they have copyright clearance on anything they provide).
Location and talent preparation
- Ensure that you have permission to shoot in the locations you have selected. Begin by contacting Events Services, which manages on-campus film permissions. Note that any top-of-building access requires special safety training in advance.
- Prior to the day of the shoot, ensure that health and safety dependencies are considered, insurance certificates are in place, and that any high-risk activities be approved by Risk Management.
- Depending on location and time of shoot (e.g. if you have videographers on campus in your absence for set-up etc.), alert Campus Security and Events Services that there will be a film crew on campus and obtain permission to shoot.
- Before filming subjects, ensure you secure their permission with a model/talent release.
- If the subject of the clip is a large group at a public event, then permission is not required but a Notice of Image Capture sign should be displayed.
Outro bumper
An outro bumper — sometimes called the end screen or end card — is the last part of your video after the main content is done.
Outro bumper preview
UCalgary outro bumper
Can be used at the end of all UCalgary-produced videos. The landscape version is ideal for standard definition or 16:9 video. The portrait version is ideal for social media posts and stories.
Transitions
Transitions are a visual tool used in editing to connect one part of a video to another.
Transitions preview
Download includes all five transitions.
Corner bugs
A bug is a graphical element that usually displays in a corner of a video for some or part of the runtime. It's an unobtrusive way of branding the video while footage is playing.
Corner bugs preview
There are two options for UCalgary corner bugs: 1. Logo only and 2. Logo with a watermark that remains after the bug fades out. Download includes both options.
Corner bugs with faculty lockups are also available. Send a request to brand@ucalgary.ca
Text animations
Text animations can be used to add flair and movement to words and sentences within your video. Use in combination with footage to emphasize titles, key messages and quotes.
Text animations preview
These templates are designed for import to Adobe Premiere Pro. Download includes all nine templates.
Lower thirds
Lower thirds are a combination of text and graphic elements in the lower area of the video frame to give the audience more information. They are typically put over interview footage to identify the subject.
Lower thirds preview
These templates are designed for import to Adobe Premiere Pro. The download includes both right and left lower thirds files.
Countdown clock
A video to have onscreen before kicking off your webinar or event.
Countdown clock preview
Available in 5 and 15 minute countdowns. Need a custom time? Send a request to brand@ucalgary.ca

Start something video assets
If your video aligns with the campaign, use the below Start something-specific assets. Learn more about the Start something campaign.
Start something outro bumper preview - quick version
Outro bumper - quick version
The landscape version is ideal for standard definition or 16:9 video. The square version is ideal for social media posts.
Start something outro bumper preview - words version
Outro bumper - words version
This outro bumper is a little longer and features other action words from the campaign. The landscape version is ideal for standard definition or 16:9 video. The square version is ideal for social media posts.
Start something outro bumper preview - slow version
Outro bumper - slow version
This outro bumper features more sedate motion graphics. The landscape version is ideal for standard definition or 16:9 video. The square version is ideal for social media posts.
Start something transitions preview
Start something transitions
Download includes all four transitions.

Convocation video assets
Use these assets for convocation-related videos. Learn more about the UCalgary convocation visual identity.
Convocation outro bumper preview
Convocation outro bumper
Can be added to the end of convocation-related videos. The landscape version is ideal for standard definition or 16:9 video. The square version is ideal for social media posts.
A portrait version, ideal for social media stories, is also available here.
Convocation transition preview
Convocation transition
Can be used between clips in convocation-related videos. The landscape version is ideal for standard definition or 16:9 video. The square version is ideal for social media posts.
A portrait version, ideal for social media stories, is also available here.
Convocation lower thirds preview
Convocation lower thirds
Use to identify speakers in convocation-related videos. This template is designed for import to Adobe Premiere Pro.

Alumni video assets
Use these assets for alumni-related videos. Learn more about the UCalgary Alumni visual identity.
Alumni outro bumpers preview
Alumni outro bumpers
Can be added to the end of alumni-related videos. Download includes all three outros.
Alumni transitions preview
Alumni transitions
Download includes all three transitions.
Video examples
Examples of our video assets in action. Watch more on the UCalgary YouTube channel.
National Philanthropy Day
Congratulations Class of 2023
Hunter Student Commons
