- Based on information given at API Refresher in Nashville Spring 2006 by Margaret Pelfrey
- In order to create custom Java screens, you need to do your work on a PC that is already running the Java WorkFlows client.
- Nothing has changed in GL3.0 regarding what needs to be done on the server side to create and utlitize custom subphases. That is: Prompts.u98 and Tools.u98 set up is the same as before.
- Create a directory to work in on your PC -I made one called C:\Customrpts This is your base directory that will be referenced in subsequent steps. This directory needs to be defined in your CLASSPATH as well.
- Download from Sun site and install on your PC Java JDK or SDK-we are on Unicorn GL3.0.1 and I downloaded the windows 32 bit offline file (J2SE development kit 5.0 update 11 Jdk-1_5_0_11-windows-i586-0.exe) into c:\Customrpts
- Download page
- Download instructions
- I double clicked the file I had downloaded and it installed in C:\Program Files\Java|jdk.1.5.0_11
- A simple introduction to Java I found helpful.
- Now we are at Symphony 3.2.1 and I found that I could still used the old compiled custom.jar I had but to unjar the new sirsi delivered screens.jar file, I first went back to the Sun site and downloaded Java SE Dev.Kit 6u10 Beta b25 offline Windows platform file (jdk-6u 10-beta-windows-i586-p.exe). Installing that into my C:\Program files\Java\jdk1.6.0_10 folder and referencing it in a new setup.bak which I created in a new working folder (C:\GL321screensjar).
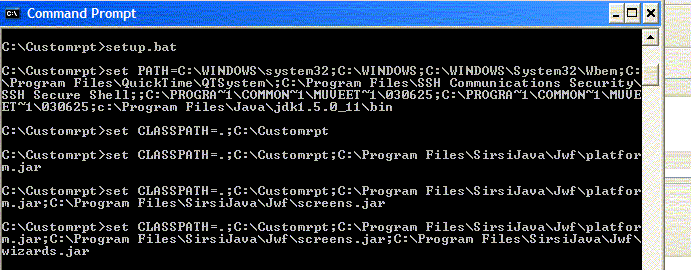
- Inside your newly created directory, create a file called setup.bat like the example Margaret gave. It declares your path statements to your Java SDK and your base directory. Mine looks like this:
set PATH=%PATH%;c:\Program Files\Java\jdk1.5.0_11\bin
set CLASSPATH=.;C:\Customrpt
set CLASSPATH=%CLASSPATH%;C:\Program Files\SirsiJava\Jwf\platform.jar
set CLASSPATH=%CLASSPATH%;C:\Program Files\SirsiJava\Jwf\screens.jar
set CLASSPATH=%CLASSPATH%;C:\Program Files\SirsiJava\Jwf\wizards.jar
- At the Command Prompt (formerly known as the DOS prompt), go to your base directory and execute the setup.bat as in:

- The first time anyone at your site works on custom subphases, they will copy custom.jar from the WorkFlows\Jwf directory on their PC into their base directory.
- Any future custom subphases created, the custom.jar file will need to be transferred down from the 'getpathname clients' directory on the server.
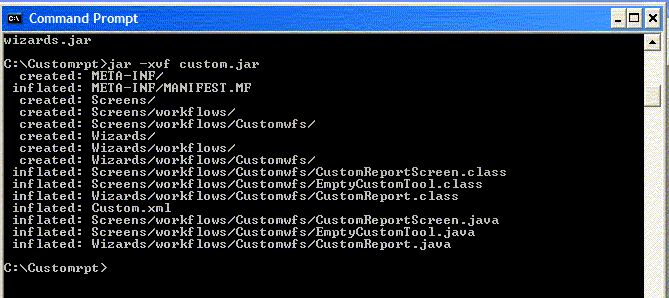
- Now that the custom.jar file has been copied in your base directory (into C:\Customrpts for me), it is time to unjar it. This will create a directory tree in your base directory.

- When you unjar the custom.jar file it creates the following directories:
 your_base_directory\Screens\workflows\Customwfs
 your_base_directory\Wizards\workflows\Customwfs
- SirsiDynix has delivered some template *.java files called EmptyCustomTool.java that can be used to create your own version. It can be found in your_base_directory\Screens\workflows\Customwfs\EmptyCustomTool.java
- Do not remove or modify the delivered files of: EmptyCustomTool.java, CustomReportScreen.class and CustomReportScreen.java. Copy EmptyCustomTool.java and rename it and then modify it to become your custom java screen file.
- Here is the contents of my Customoneentryid.java file:
/*
 * Copyright (c) 2003 by Sirsi Corporation.  All Rights Reserved.
 */

package Screens.workflows.Customwfs;

import com.sirsi.platform.api.*;
import com.sirsi.platform.dataspace.DataList;

public class
Customoneentryid extends CustomReportScreen
{
public
Customoneentryid(String toolName,DataList entry)
{
	super(toolName,entry);
}

protected void
drawScreen()
{
	LabelFieldUnit labelField;
	WriteFieldUnit writeField;

        if (isEntryDataPresent(entry,"p0"))
	 {
	 labelField = createLabelField("Entry Id:");
	 setAnchorLabelField(labelField,CENTER);
	 addLabelField(labelField);

	 writeField = createWriteField(20,2500);
	 upperCaseWriteField(writeField);
	 setEntryCodeWriteField(writeField,entry,"p0");
	 addWriteField(writeField);

	 newline();
         }
}

}
- NOTE: the class file's name is just Customoneentryid.
- Both my example above and the one Margaret gave relate to a data field wherein staff can enter text. Both are DATA_STRING types of data fields.
- My dictionary file is in Rptcustom/Tools.u98/Custom and is called oneentry_id with contents of:
$ more oneentry_id
entry_id|0|0|Entry ID|p0||DATA_POLICYLIST|type(ENID) use(5:7)||
- Note that the tool name is entry_id.
- In the .java file the top part of the file stays as is:
public class
Customacccode extends CustomReportScreen
{
public
Customacccode(String toolName,DataList entry)
{
	super(toolName,entry);
}
- The class file's name is just Customoneentryid.
- The second part of the Customoneentryid.java code has a few changes for the p#, the LabelField and again p#:
        if (isEntryDataPresent(entry,"p0"))
	 {
	 labelField = createLabelField("Entry Id:");
	 setAnchorLabelField(labelField,CENTER);
	 addLabelField(labelField);

	 writeField = createWriteField(20,2500);
	 upperCaseWriteField(writeField);
	 setEntryCodeWriteField(writeField,entry,"p0");
	 addWriteField(writeField);

	 newline();
         }
- p0 is datacode that maps to the dictionary line.
- Entry Id is the label for the datafield.
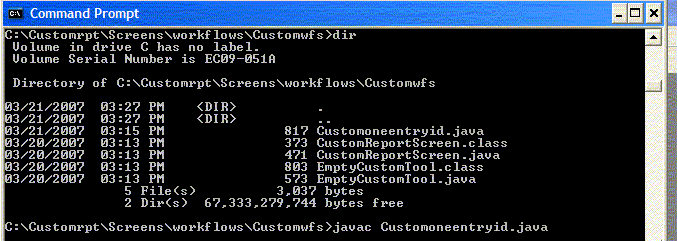
- Compile the Customoneentryid.java file which will create the Customoneentryid.class file. This command is issued from the command prompt while you are in the correct directory where this .java file is.

- Now go to C:\your_base_directory\Wizards\workflows\Customwfs where you will create a hook by modifying the CustomReport.java file and listing your new custom tool in the CustomReport.java file.
- Here is a copy of my CustomReport.java file which has two custom subphases/screens/or tools in it (oneentry_id and itemid_as.
/*
 * Copyright (c) 2003 by Sirsi Corporation.  All Rights Reserved.
 */
package Wizards.workflows.Customwfs;

import com.sirsi.platform.screen.BasicScreen;
import com.sirsi.platform.dataspace.DataList;
import com.sirsi.platform.subroutine.Clib;

import Screens.workflows.Customwfs.*;

public class
CustomReport
{
public final static String[][] customTools = {
         {"oneentry_id","Oneentry ID"},
         {"itemid_asis", "ItemID Asis"},
		{null,null}
		};

public static String
getCustomDisplayString(String toolname)
{
	int index;
	String name = toolname;

	index = 0;
	while (index < customTools.length)
		{
		if (toolname.equals(customTools[index][0]))
			{
			name = customTools[index][1];
			}
		index = index + 1;
		}
	return(name);
}

public static BasicScreen
getCustomScreen(String toolName,DataList entry)
{
	BasicScreen screen = null;

      if (Clib.strEqual(toolName,"oneentry_id"))
		{
		screen = new Customoneentryid(toolName,entry);
		}

      if (Clib.strEqual(toolName,"itemid_asis"))
		{
		screen = new Customitemidasis(toolName,entry);
		}


	return(screen);
- In the first section where you see the line "import Screens.workflows.Customwfs.*;" is a list of directories wherein custom screens can be found. Some sites might want to create subdirectories for the types of tools. For example, you might have a subdirectory named "Edit".
- The section with the public final static String area, is where you list the tool and then the TEXT you want to appear on the Tab for that selection screen within Workflows.
- Note that in the next section the tool name and the class file name are listed.
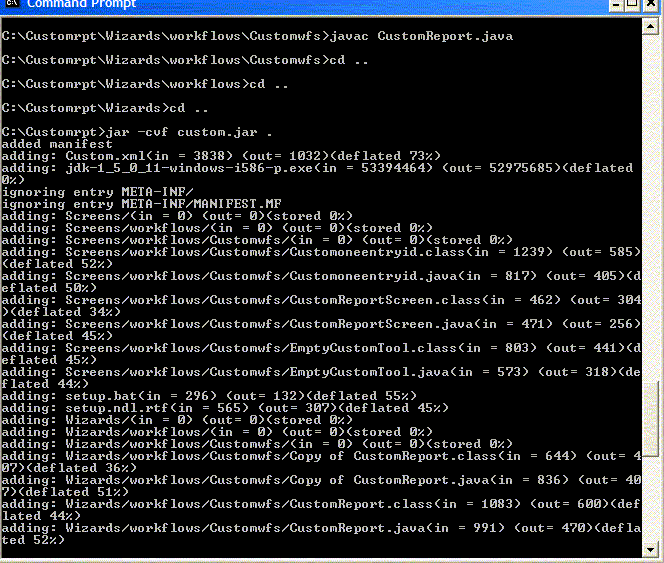
- Next step is to compile the CustomReport.java file. Again via command prompt while in the correct directory:
C:\Customrpt\Wizards\workflows\Customwfs> javac CustomReport.java
- This steps will also compile any .java files under the your_base_directory\Screens\workflows\Customwfs directory tree if you missed that step earlier.
- The next step is to jar the custom.jar file back in your base directory.

- Now move the custom.jar file from PC to the server. Transfer the file in binary mode and place in the `getpathname clients` directory.
- After it is in place, you need to edit the stamp file in the same directory on the server to force the custom.jar file to transfer back down to all the clients. The line to edit in stamp file is the one labelled CUSTOM with a number after it. Increment the number. If there is no CUSTOM line, just add one.
$ more stamp
WF_UPDATE|3002|
HP_UPDATE|3000|
AC_UPDATE|3000|
EC_UPDATE|3000|
WF_FULL|3002|
HP_FULL|3000|
AC_FULL|3000|
EC_FULL|3000|
CUSTOM|1002|
WIZARDS|1000|
SCREENS|1000|
- NOTE: on our GL3.1 system and now on our test Symphony 3.2.1 system, the custom.jar file and stamp file is in the `getpathname clients`/Custom directory.
- During Upgrades/Updates, the stamp is redelivered. The CUSTOM line will be set back to 1000 so it will force the old version of custom.jar to be overwritten on your PC. So you need to modify this stamp file after any upgrade/update.
- Oddly, you will need to access the Java WorkFlows client TWICE before you will be able to use any reports (not just the custom report). So timing is important and of course, you don't want to do this to your staff too often!
- Trouble shooting hints from Margaret:
Edit wf.bat in the sirsi\jwf directory on your PC and change "javaw" to "java".
This will leave the command window up for the WorkFlows client.
In this window, you will see any java errors.


In the base_directory\sirsi\workflows\property\preference file there is a debug
 line. Change the value from N to Y.

developer.debug.enabled=N
developer.debug.file=c:/temp/debug
- My path statment to the preference file is C:\Documents and Settings\Margaret Pelfrey\Sirsi\Workflows\Property
- Another thing to try is to look at the decompiled code of a sirsi built screen file (although the decompiled code is cryptic).
- create a new folder say C:\Screens.gl31 or whatever
- create a new setup.bat for this new C:\Screens.gl31 folder
- copy the C:\Program Files\....sirsi java folder\Jwf\screens.jar to new folder
- open a command prompt and run the setup.bat in the right folder
- unjar the C:\Screens.gl31\screens.jar file as noted above and all the subfolders will appear
- now you'll see all the subfolders and files (all class files, no java files).
- find the screen you are interested in viewing and using the command prompt go to that folder and do: javap -c CustomItemIds (view it on screen output or redirect output to a file > test.ndl)
- Later found a much easier way to view they class files using JAD tool off the web. It is a java decompiler that is free and works very quickly and easily. Nothing fancy but I like that. You simply install it. Then copy whatever .class file you want into the directory JAD was installed into. Then use the command prompt to go to the directory where you installed JAD (for me it is at C:\....\Desktop\jadnt158) and type:
jad EditFundCyc.class
- Voila, a file called EditFundcyc.jad will appear in the same directory which you can open in notepad and view the original .java file that sirsi created.
- GOOD LUCK!!!
Back to: Unicorn Staff Help,
Table of Contents

NDL
University of Calgary Library, ITS


